Sign Up & Log In

To access Trace Studio:

  • Visit studio.trace3d.app on any browser.
  • Log in using your Google, Apple, or email credentials.
  • Your Trace account and content syncs automatically across mobile (Creator App) and web (Trace Studio), ensuring a seamless workflow.

Teams

Trace Studio allows you to collaborate with others through Teams. Teams help manage permissions and streamline project access.

  • Default (My Workspace): Every user starts with a personal workspace where initial content, scenes, and projects are deployed.
  • Creating a Team: Select the 'Create a Team' button to set up a new Team. Invite collaborators to share content and projects.
  • Managing Team Permissions:
    • Assign specific access levels (owner, edit, view).
    • Organize files into shared folders for easy access.
    • Scenes and Projects inherit Team permissions unless otherwise specified.

Switching Teams: If you are a member of multiple teams, toggle between them from the Team Dropdown in the sidebar.

Content Management

Easily organize and manage 3D assets, images, videos, and other AR content in your Content Library.

  • Upload Assets: Tap the 'Create New' button to upload assets from your computer or drag files directly into your browser.
    • Supported formats: .glb, .jpg, .png, .mp4.
    • Optimize file sizes for better AR performance:
      • Images: Use compressed JPEG or PNG files, keeping resolution under 2048x2048px and file size under 2MB where possible.
      • Videos: Convert to MP4 (H.264) with a size of less than 10MB per 30 seconds of video.
      • 3D Models: Try to keep files under 10MB, use GLB format, and reduce polygon count where possible.
      • Learn more about asset optimization and asset best practices here. 
  • Organize Folders and assets:
    • Use folders and structured file names for better organization.
    • Ensure your assets and folders are assigned to the correct Teams.
    • Click the three-dot menu on an asset to rename, move, download, or delete assets.

Catalog

The Catalog provides access to a growing library of pre-made 3D assets, images, and effects to test your ideas and enhance your AR Scenes.

  • Browse Featured Packs & Assets
  • Add Assets Directly to Your Content Library
  • Search & Filter by Categories

Request new asset packs at info@trace3d.app

Project Manager

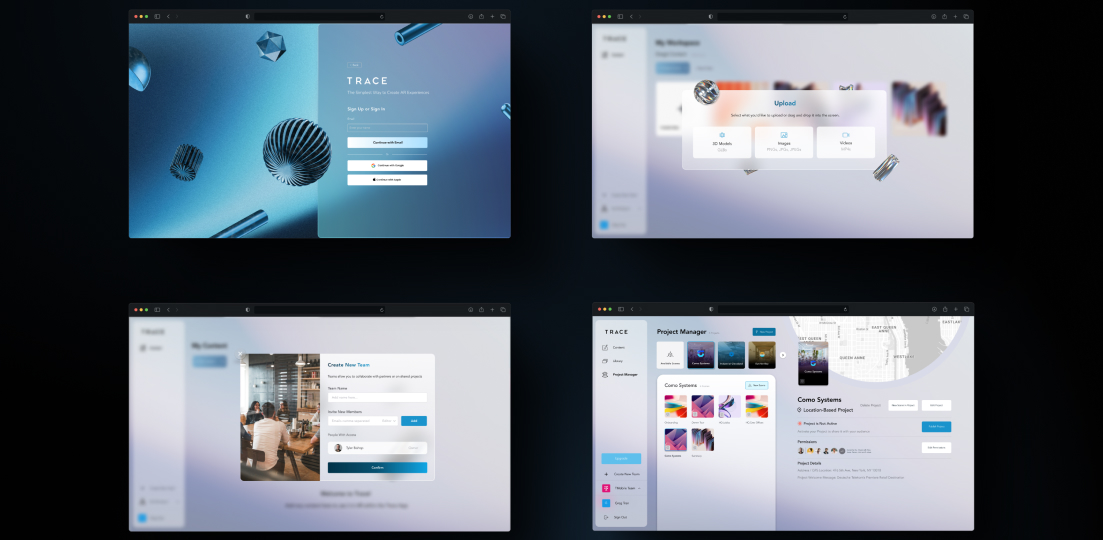
The Project Manager is where you structure and publish AR content. It consists of Projects and Scenes.

Projects

Projects are collections of Scenes that can be published for audiences to experience. Find details about Creating a Project and related buttons and settings below. 

  • Create a Project
    • Select your Project Type
      • Location-Based Projects: Tied to specific GPS locations.
      • Anywhere Projects: Can be accessed anywhere.
    • Add Scenes to your Projects. 
    • Projects can only contain Scenes of the same type (Location-Based or Anywhere). Location based scenes need to be in the same location as their Project. 
    • Finalize your Project with your branding, name and welcome message. 

  • Edit Project: This button will let you edit associated scenes and branding details
  • Edit Permissions : Permissions for your Project are inherited by the Team it is in, but you can edit them on an individual basis with this button.  
  • Publish Project: This will allow you to Publish a Project for your audience. 
    • Click 'Publish Project', select a license and activate the Project.  
    • The Activation Status will show if your Project is live. 
    • Published Projects can be shared through links, QR codes, alphanumeric codes and GPS location.  

Scenes

Scenes are individual AR experiences within a Project. You can create new Scenes or link existing ones. Add models, text, recordings, and interactions using the Trace Creator App.

Find details about Creating a Project and related buttons and settings below. 

  • Create a Scene: Ensure you are in the right Project and Tap the ‘New Scene’ button.  You can make a stand-alone Scene under the ‘Available Scenes’ tab. 
    • Select your Scene Type
      • Location-Based Scenes: Tied to specific GPS locations.
      • Anywhere Scenes: Can be accessed anywhere.
    • Add an Image Anchor if desired.  You can learn more about Anchor Creation here.
  • Edit Scene: Adjust name, location and anchor details
  • Connect to a New Project: Kicks off the Project Creation flow with the selected Scene included.
  • Publish as a Project: Upgrades your Scene to a Project upon acquiring a License.

Edit Permissions : Permissions for your Scene are inherited by the Team it is in, but you can edit them on an individual basis with this button.

Licenses

For commercial use, Trace offers licensing options to fit different needs:

  • Personal License: For non-commercial personal or educational use.
  • Commercial License: For small businesses under 5,000 sqft showcasing AR content.
  • Enterprise Plans: Tailored for large organizations, institutions, and events.

Once you purchase a license, it becomes available for deployment on your Projects.

  • Click 'Publish Project' to see your available licenses and activate/deactivate Projects.
  • Project Licenses are floating licenses, allowing reassignment to other Projects as needed.
  • Deactivating a license returns it to your 'Available Licenses' until reactivated or discontinued in settings.

Full details on Trace licensing and content limits can be found within Trace Studio. A Free Version is also available for personal use with limited assets and scenes.

Trace also provides professional services for immersive AR experiences. Contact info@trace3d.app for pricing or a demo.

Settings

Customize your Trace Studio experience through Settings:

Personal Settings

  • Profile: Update name, icon, and profile details.
  • Login & Security: Manage passwords, sign out of devices, or delete your account.
  • Billing: View personal billing details and invoices.

Team Settings

  • Your Team: Update name, icon, or remove the team.
  • Team Members: Manage member roles, permissions, and invites.
  • Billing: View team billing details and invoices.
  • Payment Methods: Manage payment details.

Purchase History: Track past purchases.

Additional Resources

For more Trace support, explore these overviews:


Enjoy managing and publishing your AR projects using the Trace Studio!

Back to Help Center
ArrowArrow