Sign Up & Log In

Getting started with the Creator App is simple:

  • Download the app from the App Store (iOS) or Google Play (Android).
  • Sign up or Log In via Google, Apple, or email address.

Your work automatically syncs across devices, integrating with Trace Studio on the web to manage your Content, Teams, Scenes, and Projects.

Create Tab (Home Screen)

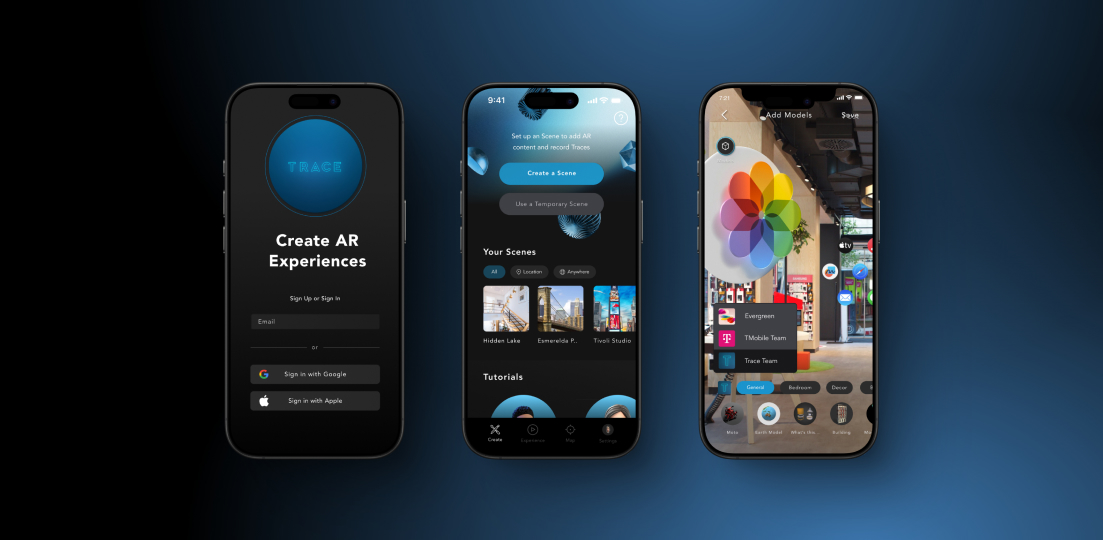
Once logged in, you will land on the Create tab, where you can quickly start or edit your AR Scenes.

  • Create a Scene to build a new AR environment and save content.
  • Use a Temporary Scene to test content and recordings in AR without saving.
  • ‘Your Scenes’ displays all available Scenes you can access and edit.
    • Use filters to sort and find specific Scenes.
    • Location-based Scenes require you to be within the correct GPS area to view.
    • Select a Scene to open and edit it.
  • Tutorials provide examples of AR content and recordings to inspire and guide your creations.
  • Help Section is accessible via the '?' icon in the upper right corner.

Use the Nav Bar to switch between Experience, Map, or Settings sections.

Create a New Scene

To create a new Scene, tap 'Create a Scene' and follow the setup process:

  • Choose a Scene Type:
    • Location-Based Scene: Anchored to a real-world location using GPS and an image anchor. Only accessible when users are at that specific location.
    • Anywhere Scene: Freely placeable and viewable anywhere. Can be movable by the user or anchored to an image such as product packaging, a sticker, or any repeating graphic.
  • Enter a Scene Name to identify your project.
  • Select your team & Privacy:
    • My Workspace: This is your default team available and is only available to you.
    • Other Teams: If you have set up other teams within the Trace Studio you can select them here.  Your Scene can be assigned to Team and inherit the same privacy and editing settings. 
  • Connect to a Project (Optional): Link your Scene to an existing Project. Projects are groups of Scenes that can be published and managed within Trace Studio on the web.
  • Set Up an Image Anchor (If Required):
    • Take a picture of a 2D marker, static object or sign to use as an anchor.
    • You can upload an image instead if you have a pre-designed graphic.
    • Image Anchors must be square and clearly recognizable.
    • Set the real-world size of the image (in cm) for accurate scaling.
    • Ensure your anchor is fixed in place, as it determines content placement.
    • Scan your Anchor to enter the Scene.
  • *Find detailed Anchor Creation Guidelines here

Inside a Scene

Once you are inside your Scene you will see a live camera view of your environment, allowing you to place and interact with AR content. Saved content remains persistent and can be edited at any time.

Adding Content

Tap the ‘Create’ button to bring up your Creation Tools.

  • Trace Recording: Record yourself as a 3D hologram for guided tours, instructions, or storytelling.
    • Tap Record to begin and move around your space, keeping your face in view during the whole recording.
    • You can adjust your Avatar with a pre-built, stylized, or photoreal design. 
    • Additional tools allow you to highlight details while recording.
    • *Find the Recording & Avatar Guide here
  • Models: Add 3D models, images, videos, and VFX to your Scene.
    • Use the team and folder icons to select your current team and assets.
    • Tap a model to place it in your space.
    • Adjust placement using touch gestures to scale, rotate, and position.
    • Drag the floor indicator to move objects forward and backward.
    • Enable or disable collision settings to control interactions with surfaces.
    • Save once satisfied with the layout.
  • Text: Quickly input and position text elements with adjustable fonts and styles.
  • Draw: Create sketches, highlights, and annotations in your Scene by selecting colors and drawing directly on the screen.

Scene Tools

  • Scene Details: Modify the Scene name, permissions, and Project linking.
  • Realign: Adjust Scene positioning.
    • For Anchored Scenes: Realign to an image marker.
    • For Non-Anchored Scenes: Center the Scene within your current view.
  • Capture: Take photos or videos of your Scene.
  • Share: Share your Scene via links, codes, or QR codes. Shared Scenes can be edited by team members in your Workspace and viewed by audiences in the Viewer App if part of a Published Project.

Experience Tab

The Experience Tab displays what visitors will see when they access your Published AR experiences through the Trace Viewer Apps.

  • Preview your own AR experiences as a viewer.
  • See AR experiences from other creators that have been shared with you.
  • Input codes to access additional AR content.

Map Tab

The Map Tab shows published AR experiences nearby in a map-based view. Use this feature to explore your own experiences or discover content from other creators in your area.

Settings Tab

Within Settings, you can manage details about your Account, Scenes, and Environment Controls.

  • Project Manager: Manage and edit Scenes and Projects. Full controls are best accessed via Trace Studio on the web.
  • Help: Access in-app tips and guides.
  • Send Logs: Share usage logs with the Trace Team for troubleshooting.
  • Clear Cache: Reset cached data, including Scene, Project, Model, and Avatar settings.
  • Sign Out: Log out of your current account.
  • Environment Depth: Adjust depth mapping and meshing quality. 
  • Human Depth & Stencil: Control occlusion quality around people in your Scene.
  • Occlusion Preference: Choose between Human or Environment occlusion.  Human occlusion is set to be on by default.  Environmental Occlusion will only run if selected. 
  • Collisions & World Planes: Enable models to interact with walls and surfaces.

Project Manager

The Project Manager section is accessed through the Settings menu and allows users to edit basic Scenes and Project details.  To set up or publish Projects and for detailed Scene controls use the Trace Studio on the web. 

Additional Resources

For more Trace support, explore these overviews:

Enjoy creating immersive AR experiences with the Creator App!

Back to Help Center
ArrowArrow