Before You Start

Before diving into Trace, here are a few key things to know:

What is AR Content?

Augmented Reality (AR) content overlays digital elements—such as 3D models, videos, or text—onto the real world using your mobile device or AR headset. With Trace, you can create interactive AR experiences that users can view in real-world locations or anywhere they choose.

What is Trace?

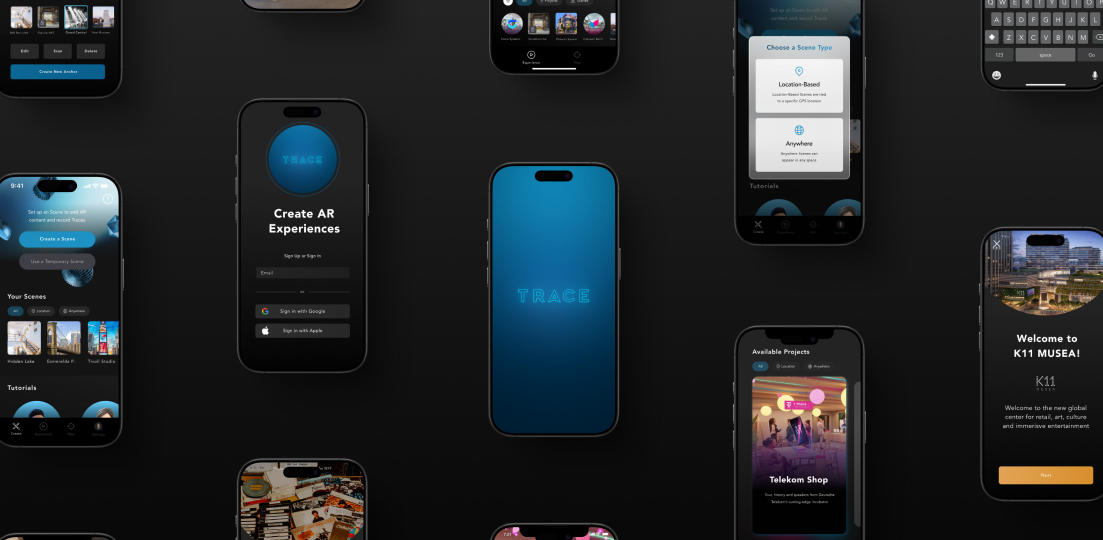
Trace is the easiest way to create and experience Augmented Reality (AR) content. Whether you're designing immersive experiences for personal projects, businesses, events and more, Trace is a comprehensive platform to make it easy for you to create and deploy AR experiences across devices. 

  • Design AR Scenes using 3D models, videos, images, and text.
  • Publish immersive experiences for audiences to view via mobile and AR headsets.
  • Share AR content through links, QR codes, and experience codes.

What You Need to Get Started

To ensure a smooth experience, make sure you have the following:

A Compatible Device

  • Trace Creator App: Available on iOS and Android for creating and editing AR Scenes. (3D Recordings on iOS only.)
  • Trace Viewer App: Your viewers can experience your published content on iOS, Android, and AR headsets (Apple Vision Pro & Meta Quest. Partner support for Hololens 2, ThinkReality A3)

A Stable Internet Connection

  • Required for uploading content, syncing projects, and viewing cloud-hosted AR experiences.

Step 1: Sign Up & Log In

Trace Creator App

The Trace Creator App (iOS & Android) is your go-to tool for designing and managing AR experiences on mobile. It allows you to:

  • Create new AR Scenes
  • Upload and arrange 3D models, videos, and text
  • Record yourself as an avatar to share information and tours
  • Save and edit your immersive AR experiences at any time

Download the Trace Creator App to start creating AR content. Log in via Google, Apple or Email - your content syncs across devices.

Trace Studio (Web Platform)

For content, project, and team management, use the Trace Studio at studio.trace3d.app. This CMS is your web-based hub where you can:

  • Upload and organize assets (3D models, images, and videos)
  • Manage projects and scenes
  • Collaborate with teams by sharing assets and projects 
  • Publish your content officially for your audience

Visit the Trace Studio for deeper asset management and publishing control.

Step 2: Create Your First Scene

Scenes are the foundation of all AR content in Trace. A Scene contains 3D models, videos, text, and recordings placed in an AR environment. Scenes can be added to Projects to be published fully for your audience.

  • Open the Creator App and tap "New Scene."
  • Choose a Scene Type:
    • Location-Based Scene – Requires GPS and an image anchor to tie the Scene to a real-world location.
    • Anywhere Scene – Can be freely placed in any environment, with an optional image marker.
  • Name Your Scene & Adjust Settings – Select a name, team and other details
  • Capture an Anchor Image (if required) – Choose a logo, sign, or object as a reference point. Make sure it is static and 2D. 
  • Save & Begin Adding AR Content!

You can also make Scenes and manage Projects (groups of Scenes) on the Web with Trace Studio.

Step 3: Add AR Content

Now that you've created a Scene, it's time to bring it to life with AR content. Trace makes it easy to add and arrange different types of assets within your scene.

  • Place 3D models, images, and videos.  You can add your own within the Trace Studio.
  • Use simple drag, scale, and rotate gestures to position objects.
  • Use Trace Tools like text, drawings, and 3D recordings to complete your setup. 
  • Content remains editable, so you can return and make adjustments anytime.

Step 4: Publish & Share

With your Scene complete, you can view and edit it any time with friends and teammates within the Trace Creator App. To share publicly, add your Scene to a Project in the Trace Studio and publish it for anyone to view on the Trace Viewer App and AR Headset apps.

Publishing Steps:

  1. Log into Trace Studio at studio.trace3d.app
  2. Create a new Project and add your Scene, or upgrade an existing Scene to a Project.
  3. Publish your Project and select a license if needed.
  4. Once published, your Scene becomes accessible to your audience, allowing them to interact with it through the Viewer App or supported headsets.

Additional Resources

For more Trace support, explore these overviews:


Start creating incredible AR experiences for your audience!

Back to Help Center
ArrowArrow